NID fee payment by Rocket app; NID fee payment process, fee amount, and information are here. When we go to any office of the Bangladesh Election Commission to register a NID card, we have to pay a certain fee for the registration of the NID card.
I faced many difficulties while trying to pay the NID information correction fee. I have searched on google for the right information. I have tried several methods of paying the NID fee. I will show you the easiest way to pay the NID fee.
Payment of this fee can be done in various ways. One of the popular and easiest methods is to pay fees through the Rocket app. That will be discussed today. Let’s find out.
NID Fee Payment Process Using Rocket App
For registration of a NID card or correction of a NID card, we have to pay a certain fee which we can pay from Bkash, Rocket, Dutch Bangla Mobile Banking, Nagad, or any other mobile banking.
However, a popular method of paying these fees is the rocket account.
Most people in Bangladesh pay voter ID card registration fees or correction through Bkash and Rocket. But many people don’t know how to pay fees through Rocket.
If you follow today’s discussion well from the beginning to the end, you will hopefully be able to pay the NID fee easily through Rocket App from your mobile.
How To Pay NID Fee by Rocket App
Today’s discussion will be useful if you want to pay fees through Rocket. So let’s know how to pay NID card registration or correction fee through Rocket.
To pay fees through Rocket, you must first log in to the Rocket app on your mobile. After entering the Rocket app, it will show many options. From there, select the option named Bill Pay.

After selecting the bill pay option, your app will reload, and a new page will appear. There will be a search box at the top, along with some options. In this search box, you will search by typing 1000 because the NID registration or correction biller ID is 1000.
As soon as you write 1000 in the Biller ID search box, you will see an option called EC below the Biller ID search box. This is the name of the bill. Select this option. After selecting this option, your app will reload.

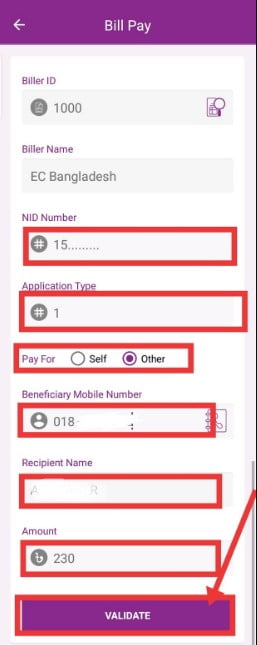
After the app is reloaded, you will see some options called NID Number Application System. In the box of NID numbers, you must provide the number of the NID card you want to correct or pay the registration fee. Then you will see an option called Application Type. Any one of these options 1, 2, 3, and 4 should be written in that option.
NID Application Type Details
Either way, they have different systems of the application type. These four options have different application types, and you need to enter the code for the application type for which you want to pay the fee. Let’s know what system each code has.
System-1: If you want to correct personal information like your name, your father’s name, your mother’s name, your village, address, post code, district, etc. Then enter 1 in the Application Type field.
System-2: To correct the father’s/husband’s name, parent’s NID number, birth certificate number, TIN, driving license and passport number, educational qualification, and mobile number, you need to enter 2 in the application type box.
System-3: If you want to amend your personal information, type 1 and type 2, you must enter 3 in the application type box.
System-4: An application type is 4. If you want to apply for a reissue or withdraw your voter ID card, you must enter 4 in the application type box.
So keeping these things in mind, you have to enter the number in the application type cell according to the system which type of application you want.
After completing this, you will see an option called pay at the bottom of this page. There are two options here. One is Self, and the other is Other. If you want to pay your ID card fee, you must select the “self” option.
And if you want to pay the fee related to another ID card, then you have to select the “other” option. After selecting another, you must enter that person’s ID card and mobile number.
After completing these, you will see an option called VALIDATE. You have to select this option. After selecting this option, you will be informed by the app about the specific amount of the bill to be paid according to your application type. After that, you have to press the OK button.
After pressing the OK button, your app will reload and show a new page with all the information you have entered. Your entered data will show there. If everything is OK, you will enter your Rocket account PIN here.
After providing the PIN, you will see an option to tap and hold. Hold this option by taping. Then your bill will be paid.
So, you have to pay a specific fee for all the registration related to the ID card, and for correcting any information, you can pay the methods discussed in today’s discussion.
If you want to know more about NID, you can let us know through the comment box. You can visit our website to solve various problems related to such ID cards. Thank you very much for visiting our website.
